Lamp Types
Relevant to Blender v2.31 MISSING AREA LIGHT AND RAYSHADOW HINTS
Blender provides four Lamp types:
Sun Light
Hemi Light
Lamp Light
Spot Light
Any of these lamps can be added to the scene by pressing SPACE
and by selecting the Lamp menu entry. This action adds a
Lamp Light lamp type. To select a different lamp type,
or to tune the parameters, you need to switch to the Shading Context
window Figure 1 (F5) and Lamp Sub-context (
 ).
).
A column of toggle buttons, in the Preview Panel, allows you to choose the lamp type.

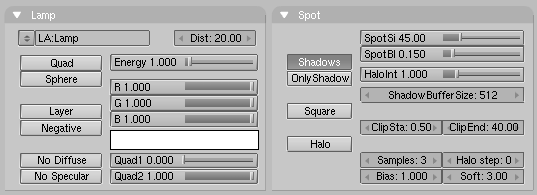
The lamp buttons can be divided into two categories: Those directly affecting light, which are clustered in the Lamp and Spot Panels, and those defining textures for the light, which are on the right-hand Texture Panel, which has two Tabs. The tabs are very similar to those relative to materials. In the following subsections we will focus on the first two Panels (Figure 2), leaving a brief discussion on texture to the Tweaking Light section (the Section called Tweaking Light).
The Lamp Panel contains buttons which are mostly general to all lamp types, hence deserve to be explained beforehand.
Negative - Makes the light cast 'negative' light, that is, the light shed by the lamp is subtracted, rather than added, to that shed by any other light in the scene.
Layer - Makes the light shed by the lamp affect only the objects which are on the same layer as the lamp itself.
No Diffuse - Makes the light cast a light which does not affect the 'Diffuse' material shader, hence giving only 'Specular' highlights.
No Specular - Makes the light cast a light which does not affect the 'Specular' material shader, hence giving only 'Diffuse' shading.
Energy - The energy radiated by the lamp.
R, G, B sliders - The red, green and blue components of the light shed by the lamp.
Sun Light
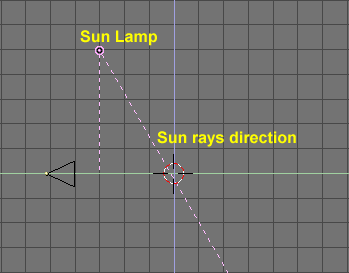
The simplest light type is probably the Sun Light (Figure 3). A Sun Light is a light of constant intensity coming from a given direction. In the 3D view the Sun light is represented by an encircled yellow dot, which of course turns to purple when selected, plus a dashed line.
This line indicates the direction of the Sun's rays. It is by default normal to the view in which the Sun lamp was added to the scene and can be rotated by selecting the Sun and by pressing RKEY.
The lamp buttons which are of use with the Sun are plainly those described in the 'general' section. An example of Sun light illumination is shown in Figure 4. As is evident, the light comes from a constant direction, has a uniform intensity and does not cast shadows.
This latter is a very important point to understand in Blender: no lamp, except for the "Spot" type, casts shadows. The reason for this lies in the light implementation in a scanline renderer and will be briefly discussed in the 'Spot' and 'Shadows' subsections.
Lastly, it is important to note that since the Sun light is defined by its energy, colour and direction, the actual location of the Sun light itself is not important.
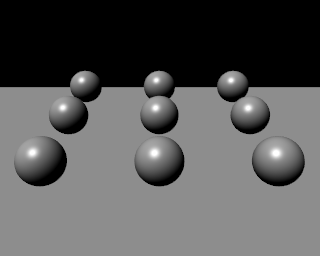
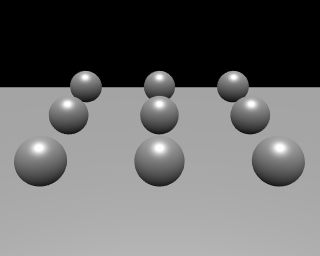
Figure 5 shows a second set-up, made by a series of planes 1 blender unit distant one from the other, lit with a Sun light. The uniformity of lighting is even more evident. This picture will be used as a reference to compare with other lamp types.

 | Sun Tips |
|---|---|
A Sun light can be very handy for a uniform clear day-light open-space illumination. The fact that it casts no shadows can be circumvented by adding some 'shadow only' spot lights. See the Section called Tweaking Light! |
Hemi Light
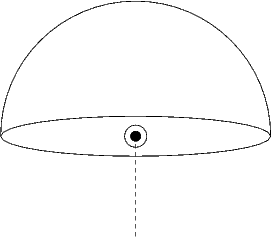
The Hemi light is a very peculiar kind of light designed to simulate the light coming from a heavily clouded or otherwise uniform sky. In other words it is a light which is shed, uniformly, by a glowing hemisphere surrounding the scene (Figure 6).
It is probably the least used Blender light, but it deserves to be treated before the two main Blender Lights because of its simplicity.
This light set-up basically resembles that of a Sun light. Its location is unimportant, while its orientation is important. Its dashed line represents the direction in which the maximum energy is radiated, that is the normal to the plane defining the cut of the hemisphere, pointing towards the dark side.
The results of a Hemi Light for the 9 sphere set up are shown in Figure 7 the superior softness of the Hemi light in comparison to the Sun light is evident.
| Hemi Light Tip |
|---|---|
To achieve quite realistic, were it not for the absence of shadows, outdoor lighting you can use both a Sun light, say of Energy 1.0 and warm yellow/orange tint, and a weaker bluish Hemi light faking the light coming from every point of a clear blue sky. Figure 8 shows an example with relative parameters. The figure also uses a World. See the pertinent chapter. |

Lamp Light
The Lamp light is an omni-directional point light, that is a dimensionless point radiating the same amount of light in all directions. In blender it is represented by a plain, circled, yellow dot.
Being a point light source the light rays direction on an object surface is given by the line joining the point light source and the point on the surface of the object itself. Furthermore, light intensity decays accordingly to a given ratio of the distance from the lamp.
Besides the above-mentioned buttons three more buttons and two sliders in the Lamp Panel are of use in a Lamp light (Figure 9):
Distance - This gives, indicatively, the distance at which the light intensity is half the Energy. Objects closer than that receive more light, object further than that receive less light.
Quad - If this button is off, a linear - rather unphysical - decay ratio with distance is used. If it is on, a more complex decay is used, which can be tuned by the user from a fully linear, as for Blender default, to a fully - physically correct - quadratic decay ratio with the distance. This latter is a little more difficult to master, it is governed by the two Quad1 and Quad2 Num Buttons and will be explained later on.
Sphere - If this button is pressed the light shed by the source is confined in the Sphere of radius Distance rather than going to infinity with its decay ratio.
Following Figure 10 shows the same set-up as in the latter Sun light example, but with a Lamp light of different Distance values and with Quadratic decay on and off.
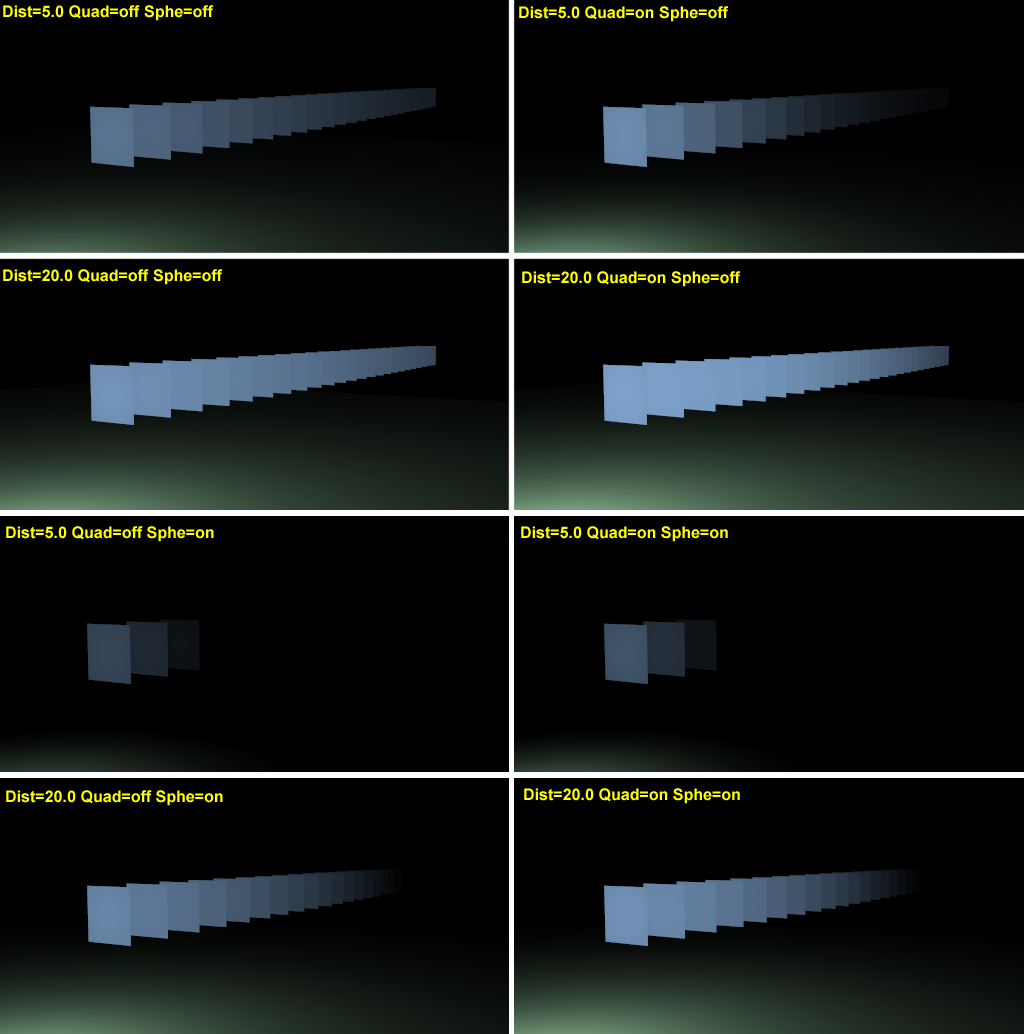
The effect of the Distance parameter is very evident, while the effect of the Quad button is more subtle. In any case the absence of shadows is still a major issue. As a matter of fact only the first plane should be lit, because all the others should fall in the shadow of the first.
For the Math enthusiasts, and for those desiring deeper insight, the laws governing the decay are the following.
Let  be the value of the Distance Numeric Button,
 the value of the Energy slider
and
the value of the Energy slider
and  the distance from the Lamp to the point where rhe light intensity
 is to be
computed.
is to be
computed.
If Quad and Sphere buttons are off:
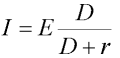
It is evident what affirmed before: That the light intensity equals half the energy
for =
.
If Quad Button is on:
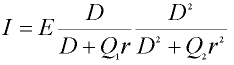
This is a little more complex and depends from the Quad1
( )
and Quad2 (
)
and Quad2 ( )
slider values. Nevertheless it is apparent how the decay is fully linear for
=1,
=0
and fully quadratic for
=0,
=1,
this latter being the default.
Interestingly enough if
=
=0
then light intensity does not decay at all.
)
slider values. Nevertheless it is apparent how the decay is fully linear for
=1,
=0
and fully quadratic for
=0,
=1,
this latter being the default.
Interestingly enough if
=
=0
then light intensity does not decay at all.
If the Sphere button is on the above computed light intensity
is further modified by multiplication by the term which has a linear progression for
from 0 to
and is identically 0 otherwise.
If the Quad button is off and the Sphere button is on:

If both Quad and Sphe buttons are on:

Figure 11 might be helpful in understanding these behaviours graphically.

Figure 11. Light decays: a) Blender default linear; b) Blender default quadratic with Quad1=0, Quad2=1; c) Blender quadratic with Quad1=Quad2=0.5; d) Blender quadratic with Quad1=Quad2=0. Also shown in the graph the same curves, in the same colours, but with the Sphere button turned on.
| Lamp Light Tip |
|---|---|
Since the Lamp light does not cast shadows it shines happily through walls and the like. If you want to achieve some nice effects like a fire, or a candle-lit room interior seen from outside a window, the Sphere option is a must. By carefully working on the Distance value you can make your warm firelight shed only within the room, while illuminating outside with a cool moonlight, the latter achieved with a Sun or Hemi light or both. |
Spot Light
The Spot light is the most complex of Blender lights and indeed among the most used thanks to the fact that it is the only one able to cast shadows.
A Spot light is a cone shaped beam generated from the light source location, which is the tip of the cone, in a given direction. Figure 12 should clarify this.

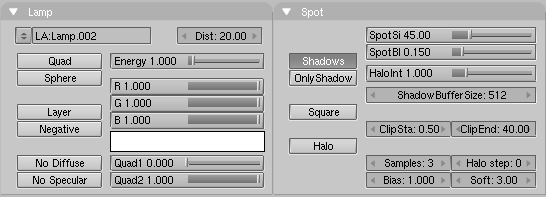
The Spot light uses all buttons of a Lamp Light, and with the same meaning, but it is so more complex that it needs a second Panel of buttons (Figure 13 in the Section called Spot Options): Spot.
Spot Options

Shadows - Toggles shadow casting on and off for this spot.
Only Shadow - Let the spot cast only the shadow and no light. This option will be analysed later on in the Section called Tweaking Light.
Square - Spot lights usually by default cast a cone of light of circular cross-section. There are cases where a square cross section would be helpful, and indeed have a pyramid of light rather than a cone. This button toggles this option.
Halo - Let the spot cast a halo as if the light rays were passing through a hazy medium. This option is explained later on in the 'Volumetric Light' section (the Section called Volumetric Light).
Spot Buttons
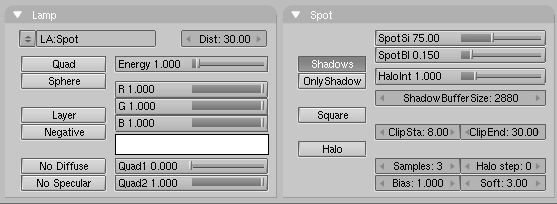
The rightmost column of buttons in the Spot Panel handles Spot geometry and shadows (Figure 14):
SpotSi - The angle at the tip of the cone, or the Spot aperture.
SpotBl - The blending between the light cone and the surrounding unlit area. The lower the sharper the edge, the higher the softer. Please note that this applies only to the spot edges, not to the softness of the edges of the shadows cast by the spot, these latter are governed by another set of buttons described in the 'Shadows' subsection.
HaloInt - If the Halo button is On this slider defines the intensity of the spot halo. Again, you are referred to the Section called Volumetric Light.
The bottom button group of the Spot light governs shadows and it is such an ample topic that it deserves a subsection by its own. Before switching to Shadows, Figure 15 shows some results for a Spot light illuminating our first test case for different configurations.

 | In Figure 15 shadows are turned off! Shadows are treated in the next section. |